source: wikimeda
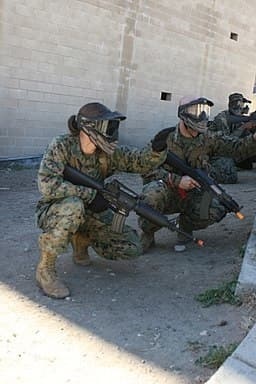
We have seen it many times. Two Airsoft teams are playing on the same mission but with total different outcomes. The result of one team can be totally different from the other team. Their success often depends on how well organized that team was during that mission and how each Airsoft player elaborated their task.
Before we give you all the insights on Airsoft squad tactics, you and your teammates have to know how to form a squad team properly. While forming a squad, the team leader assigns under his command tasks to fulfill during the mission. It actually depends on which role on the field you’re assigned to.
Which Airsoft roles do we need in order to form a team?
1.Squad Roles and Task Organization
Find out why task organization and assigning roles determines the success of your squad.
1 Military squad roles
Of course we don’t have to figure it all out by ourselves. Most of the Airsoft roles and tactics are derived from the military. The best way to learn how to form a squad team by assigning roles and tasks is analyzing how it’s done in the military. And if they do it wrong…..Then we will never win the war anyway….
I created a figure which gives you an overview of what an Airsoft Squad and a military squad looks like.
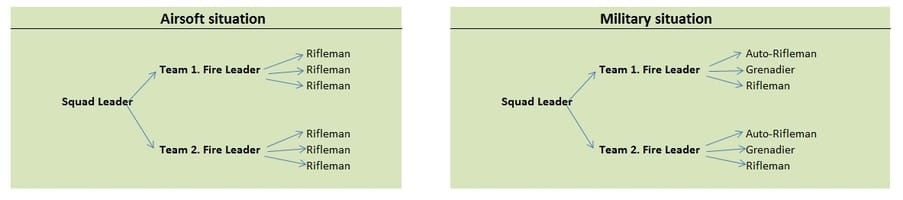
An Airsoft squad team is commonly different from what it looks like in military situations. The most striking thing for you is definitely the Sniper position that is missing. Well, we don’t recommend to put a Sniper in a Fire Team. A Sniper can only operate in an efficient and effective way with a team of two: the shooter and the security. They work closely together as the security covers the back of the shooter.
The Auto-Rifleman is someone with a Squad Automatic Weapon (SAW). The main goal (task) is to suppress your opponent with a constant stream of automatic fire. This is merely a supporting Role and is needed in several situations.
In a situation of breaking contact an Auto-Rifleman turns laying down suppressive fire as the team falls back. As the team breaks contact the Auto-Rifleman brings a constant stream of fire at the enemy.
A Grenadier is a position for specialized teams but is useful in every team. This position gives your team extra firepower to handle most situations. We’re not talking about the most common situations but more like clearing buildings and initiating an ambush.
1.2 Airsoft Squad Roles
A common Airsoft Squad exists of 9 members but could be less. It isn’t fair to say you couldn’t play Airsoft when you’ve just gathered a group of 8 friends… The situation above is more a translation from a military situation and the way it is organized. You become already a better player by understanding the logic behind the set up of a team. Now let’s go over the most common tasks on many Airsoft teams:
- Squad leader: Te squad leader has the most experience and is the overall leader of the team. he is concerned with the strategic part of the team and communicates directly with the Fire Team Leader. His concern is also to keep his men on task.
- Fire Team Leader: He/She gets his orders from the squad leader. He then directs his team to execute those orders as well as possible. The team leader also makes sure that the fire team works closely together in order to take the enemy out. Communication is very important here. He is not only leading but also prepared to participate in small scale tactics like cover fire, flanking and clearing a structure.
- Rifleman: His main goal is to get the job done. He takes is orders directly from the Fire Team Leader. He is not supposed to operate as a “lone Wolf” but is acting according their team’s interest instead. They are concerned with tactical operations like cleaning rooms, suppressing the enemy and defending objects. I wrote earlier an interesting article about the Rifleman Role here.
These are the basic tasks of a squad team. Each role is essential for being successful as a team. If you would like to know more about Airsoft Roles then check out this article.
2. Airsoft Squad Formations
Squad formations can be used in different ways and depending on the situation and vegetation. Try and practice these different formations and crush your opponent!
2.1 Squad Line Formation
Line formation is important when you encounter enemy contact. The first thing you do while under attack is to get on line. All the squad members will rush to the fire team leader or the squad leader and form a horizontal line directly facing the enemy. That way the squad leader is able to assess the situation in a better way. The squad leader then decides to attack or breaking contact.
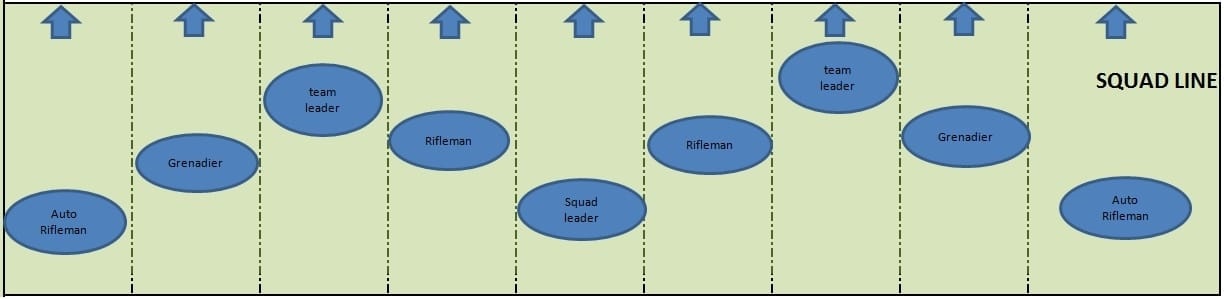
Characteristics of the line formation:
- The line formation provides maximum fire power at the front
- All squad members are in the front to attack the enemy
- This formation provide limited maneuver capability due to both fire teams being committed
- This formation also provides security to flank and rear.
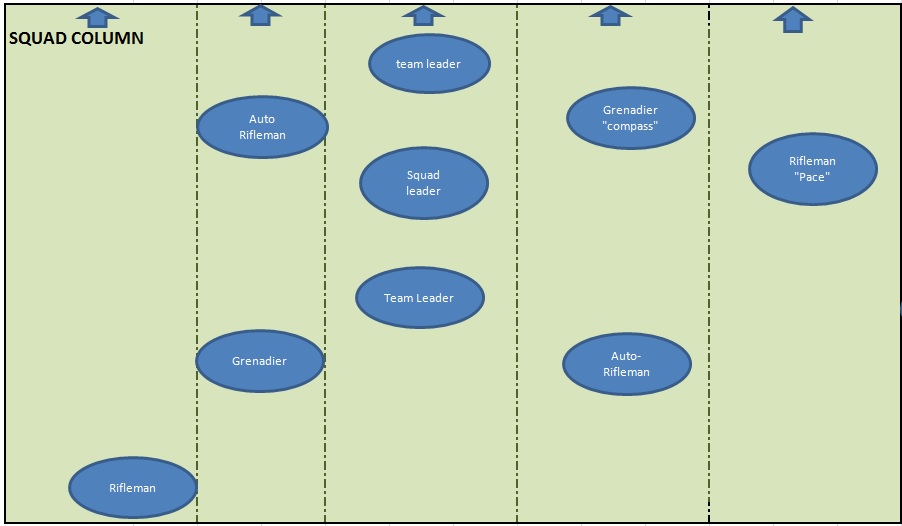
2.2 Squad Column Formation
This formation is normally used as the primary formation and it allows the most flexibility to the majority of situations.
Characteristics of the squad column:
- Provides the best compromise between the squad line and the squad file formation
- Facilitates maneuver and provides good dispersion
- Provides excellent control of the squad leader
2.3 Squad File Formation
This formation is common used in closed terrain, vegetation or limited visibility conditions. Both the squad leader and team leader position can be adjusted depending on what kind of situation you are facing.
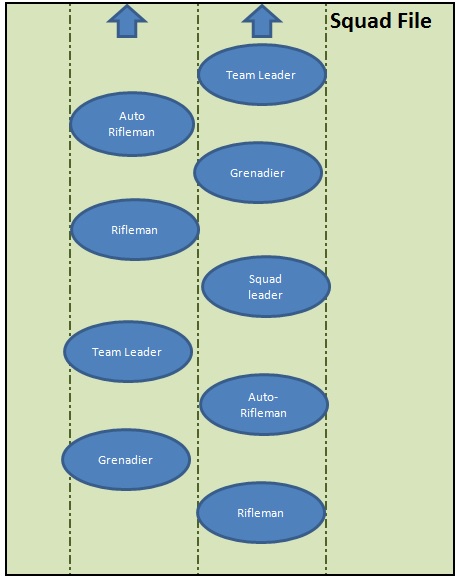
Characteristics of this file formation:
- Maximum immediate fire to the flanks
- Provides a least amount of security to the unit
- Excellent flank security
- The point man (front) and the rifleman at the rear are the most at risk
- This formation works well in woodland with thick brush
3. Airsoft Squad Movement Techniques
There are basically 3 squad movement techniques: traveling, traveling overwatch and bounding overwatch. Like formation movements, these movement techniques provide your unit with varying degrees of control, security and flexibility.
3.1 Traveling
This technique is used when enemy contact is not likely. It is common used to travel great distances because it offers the best speed and control during maneuver. A disadvantage is that it provides less dispersion and security.
The squad is divided whereby 4 men walks ahead – also called the lead fire team – , close behind the first group the squad leader and team leader. Behind the squad leader another 3 men. All squad member travel at moderate speed.
These are the 4 men (lead fire team) walking ahead:
- Auto Rifleman
- Team leader (point man)
- Grenadier (compass)
- Rifleman “pace
Then about 20 meters behind the first group:
- Squad leader
- Team leader
- Rifleman
- Grenadier
- Auto Rifleman
3.2 Traveling Overwatch
This technique is used in enemy territory to move quickly. The difference between the traveling technique is the distance between the lead fire team that is pushed out further. Approximately 50 meters. When contact with your opponent is made the squad leader is able to maneuver the trail fire team around the lead team. It is an extended form of traveling whereby the lead fire team move continuously and the trailing team at varying speed.
3.3 Bounding Overwatch
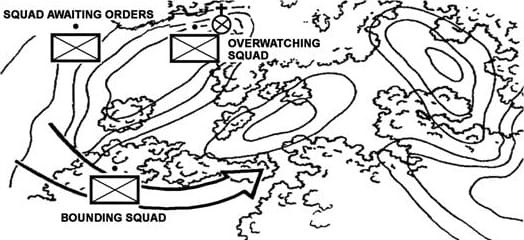
source:www.infantrydrills.com
This technique is used when crossing a large open danger area where contact with the enemy is likely. One unit overwatches the movement of another when the leader expects enemy contact. The key to this technique is the proper use of terrain(1).
these traveling techniques are less common in CQB but in Woodland I think you can use one of these techniques, or combine them in order to accomplish your mission.
4. Airsoft Squad Tactics
Squad tactics are very important to survive as a team. Take note of these techniques and become a better Airsoft player.
4.1 Breaking Contact
When your squad team is engaging the enemy the squad leader decides to further attack or breaking contact. That decision is best made when the squad forms a horizontal line directly facing the enemy so that the squad leader can assess the situation. To get on line is actually the first action of a squad when under attack.
When in contact with the enemy the squad leader is going to gauge the situation. Shall I further attack or…shall I pull back? In the US Military they use the 3:1 ratio; 3 coalitions till 1 enemy. With an advantage of 3:1 they attack, otherwise they pull back.
In Airsoft you could use the same method but maybe in a different way. Two teams mostly play against each other. With 2 large teams of 9+ squad members you probably would have made teams of 3 or 4 members with different tasks and likely different guns and gear. If then the opponent has decided to made team of 2 or 3 then you are in your favor when engaging the enemy… However, the main reasons to pull back are not enough firepower or not enough man power.
Australian Peel
A common method to pull back is called “Australian Peel”. The whole team starts firing at the opponent while one squad member after another pulls back. There are several things to keep in mind:
- superior fire power: firepower, movement, movement to cover.
- Communication: Be able to talk to your squad and let them know where you’re going and how you’re going to operate
- Keep the guns running an stay in the fight. Don’t let malfunctions allowed under stress
- Movement: Use loud verbal commands and let them know when the next is in turn to pull back
- Use hand signals
4.2 Squad Attack
A basic strategy to attack is the execution of the L-Shape. Start with every squad member on line suppressing your opponent. The lead fire team will engage fire while a second fire team move up on the right or left flank. Moving up on either the left or right flank will create an L shape. Don’t fire until you get on line with with the rest of the team.
This basic strategy is very effective especially when you get the chance to outnumber your opponent.
4.3 Ambush and counter-ambush techniques
There are many ambush and counter ambush techniques. An in-depth analysis of all these techniques will be too much for this article. Therefore I will only describe the most common used ambush and how to defend/ counter-attack.
L-shape ambush
This is one of the best techniques to use even if you’re dealing with a small group. This technique forms an L form whereby the longer portion of the L will be set op alongside the enemy. It is the extended version of the linear ambush whereby the set up of the team is in a linear fashion alongside the ambush point.
when your opponent has fully walked into your trap, the squad leader gives sign to attack. It will be a massive attack from grenadiers, auto riflemen (heavy machine gun) and even snipers. That massive attack brings your opponent in shock especially when you make the ambush as loud and chaotic as possible.
L-Shape ambush counter-attack
The best way to get out of this ambush is the Australian Center-Peel method. Simply falling back doesn’t work you will get hit from the flanks and the front. Therefore don’t just fall back, but fall back at a 45-degree angle.
4.4 Stopping your squad in a hostile area
Sometimes you may have to reassess the situation instead of charging forward. The best way to stay safe is forming a tight 360. This is a tight circle with the squad leader and fire team leader in the middle. The other squad members are on the outside of the circle scanning the environment and eliminating every blind spot. While the squad leader and team leader plan out the next strategy, the other members are scanning the environment so that the enemy can’t sneak up on your squad.
1.www.infantrydrills.com
featured image:www.commons.wikimeda.org